Since the release of the new Cloud platform of Gandi.net based on Openstack called GandiCloud VPS, I tried to convince the product owner to support more Linux distributions and other OSes like OpenBSD on the platform.
For the moment, no plans for OpenBSD in a very near future but dev teams are working on implementing new features to complete the new platform. Fair enough.
Since the rescue mode and the emergency console have been released, it’s now possible to try to install non-supported operating systems on a GandiCloud VPS. Let’s go!
I started by ordering a VPS V-R1 with Debian Bullseye as default OS. Few minutes after the VPS provisioned, I’m able to connect to the VPS:
λ kalimdor ~ → ssh debian@openbsd4life-vps
debian@openbsd4life:~$ sudo su
The first step consists on downloading the ramdisk kernel of OpenBSD. To do that, I go to the repos of OpenBSD 7.0, arch amd64, I copy the link to the ramdisk and then, let’s go to download it:
root@openbsd4life:~# cd /
root@openbsd4life:/# curl -O https://ftp.openbsd.org/pub/OpenBSD/7.0/amd64/bsd.rd
  % Total    % Received % Xferd  Average Speed   Time    Time     Time  Current
                                 Dload  Upload   Total   Spent    Left  Speed
100 4109k  100 4109k    0     0   690k      0  0:00:05  0:00:05 --:--:--  864k
In order to be easier, I took the first menuentry of the /boot/grub/grub.cfg file used to boot Debian. I open the file /etc/grub.d/40_custom and paste the configuration. I removed all lines used to boot a Linux kernel and replaced them by kopenbsd /bsd.rd. The menuentry should like this:
menuentry "openbsd-memboot" {
  load_video
  insmod gzio
  if [ x$grub_platform = xxen ]; then insmod xzio; insmod lzopio; fi
  insmod part_gpt
  insmod ext2
  if [ x$feature_platform_search_hint = xy ]; then
    search --no-floppy --fs-uuid --set=root  9a03b9ab-ac87-455e-bd8d-83318a953647
  else
    search --no-floppy --fs-uuid --set=root 9a03b9ab-ac87-455e-bd8d-83318a953647
  fi
  kopenbsd /bsd.rd
}
Note: if you try to do this on your side, be sure to replace the UUID of the partition by your own. To get the UUID of your main partition, use the command lsblk --fs.
Now, I modify the file /etc/default/grub and add/update the GRUB_DEFAULT variable to become:
GRUB_DEFAULT="openbsd-memboot"
I save the file and updated the GRUB configuration with the command update-grub:
root@openbsd4life:/# update-grub
Generating grub configuration file ...
Found linux image: /boot/vmlinuz-5.10.0-9-amd64
Found initrd image: /boot/initrd.img-5.10.0-9-amd64
done
If no errors are displayed, time to restart the server by using the command reboot.
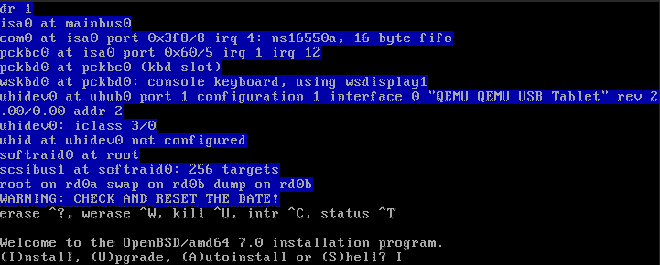
By using the Openstack CLI or the Gandi.net admin, I start a new emergency console session. With a bit of patience, we should see the OpenBSD kernel booting and after a few seconds, the message “Welcome to the OpenBSD/amd64 7.0 installation program.” arrives. First victory! 🎉

Time for the installation. To go straight forward and keep the installation simple, I follow the installation wizard in autopilot except for the user configuration and the selection of which tarballs I want to install.
During the configuration of the user, I set a password for the root user, I tell the wizard to start sshd on startup but not XOrg because I don’t care. I allow password login via SSH for the user root (this is temporary, it should be set to prohibit-password or to no when SSH keys will be provisioned).

For partitions, I keep everything as default. For tarballs, I keep everything except games and related to XOrg. To do this, I use the value -game* -x*.

When the installation finishes, it’s time to restart the virtual machine. Once connected in SSH, OpenBSD is running on a GandiCloud VPS! Yey! 🎉
OpenBSD 7.0 (GENERIC) #224: Thu Sep 30 14:13:34 MDT 2021

Welcome to OpenBSD: The proactively secure Unix-like operating system.

Please use the sendbug(1) utility to report bugs in the system.
Before reporting a bug, please try to reproduce it with the latest
version of the code. With bug reports, please try to ensure that
enough information to reproduce the problem is enclosed, and if a
known fix for it exists, include that as well.

openbsd4life# uname -a
OpenBSD openbsd4life.openstacklocal 7.0 GENERIC#224 amd64
How to configure IPv6#
During the installation, I voluntarily omitted the IPv6 connectivity configuration. This is because the default autoconf of OpenBSD is not enough to get IPv6 working on GandiCloud platform. In fact, you will need to disable two features: temporary IPv6 addresses (RFC 8981) and SOII (RFC 7217).
To do this, a modification in the interface configuration file (in my case /etc/hostname.xnf0) is needed. I simply added -temporary -soii to the line that configures IPv6. The file should look like this:
autoconf
inet6 autoconf -temporary -soii
Just to be sure that the interface is clean, I restarted the VM with the reboot command. Once back in SSH on the virtual machine, I see the same attributed IPv6 visible in the Gandi.net admin or in the Openstack CLI. A little ping6 mvieira.fr will confirm a IPv6 connectivity.
openbsd4life# ping6 -c2 mvieira.fr
PING mvieira.fr (2001:4b98:dc6:253::14): 56 data bytes
64 bytes from 2001:4b98:dc6:253::14: icmp_seq=0 hlim=63 time=0.846 ms
64 bytes from 2001:4b98:dc6:253::14: icmp_seq=1 hlim=63 time=0.949 ms

--- mvieira.fr ping statistics ---
2 packets transmitted, 2 packets received, 0.0% packet loss
round-trip min/avg/max/std-dev = 0.846/0.897/0.949/0.051 ms
openbsd4life#
Conclusion#
Installing OpenBSD even if it is not officially available is pretty easy and without any difficulties.
If you are an aficionado of OpenBSD or if you want to give it a try, feel free to reproduce my steps on your side and have not too far the excellent OpenBSD Handbook! 😉
Just to remind you, if you install any officially unsupported Linux distribution or a different operating system, don’t open a ticket to the support if you’re in trouble. 😉